So you’ve found some geocaches and you’ve uncovered a great location to hide a geocache of your own. There are no rules regarding how many caches you must have found before placing a cache. In fact, you need never have found a single cache before hiding one. However, the general consensus is that people who have found a variety of caches are more likely to know a good cache when they see one. Someone who has found 100 film pots in various piles of rocks along the same stretch of highway is likely going to hide a film pot in a pile of rocks because that’s what they think geocaching is, right?

Before you take on the role of cache owner, here are a few things to keep in mind.
1. Read the Listing Requirements / Guidelines
And then read them again. You might think this is like reading the terms and conditions before clicking on the ‘I agree’ button (which of course we all do, ahem), but it really is a good idea to read the listing guidelines before placing your first geocache.

There are some basic rules such as, “physical elements of different geocaches should be at least 528 feet / 161 metres apart.” I’ll talk about this rule more under proximity below.
There are also more region specific guidelines and there is a whole Wiki site dedicated to providing you with this information. It’s worth taking the time to read through the section for your region before you place your first cache.
2. Location, Location, Location
This really is key. It’s very tempting to hide a cache just for the sake of hiding a cache, but it’s much more rewarding to hide one in a place you know will get geocachers writing great logs and maybe even dropping a favourite point.

Some locations are more muggle heavy than others so if you’re planning on hiding your cache in a busy spot, you need to make sure it’s well hidden and perhaps even blends in with its environment.
3. Get Permission
Once you’ve found your spot, you need to make sure you have the necessary permission to place a cache there. Who you need permission from in what spots varies widely between regions so check out that Wiki site and if in doubt, call on local cachers or even your local reviewer for assistance.
4. Take Coordinates
Before leaving your cache out in the wilderness, you need to get a good set of coordinates. There is a lot of debate around whether you need a dedicated GPSr device to do this or not, since increasing numbers of geocachers solely use their smartphone to cache with. While GPS purists will argue that there is no way smartphones are as accurate at pinpointing coordinates as a GPSr, it is true to say that the latest phones really do have great built-in GPS.

When taking coordinates, make sure you do some waypoint averaging to get them as accurate as you possibly can. I do this by getting to GZ, ensuring the accuracy on my device is as low as I can get it (5 metres or lower is good), then taking a waypoint. I will walk away several times and in various directions and then walk back to the point again, taking waypoints each time. When I get home, I will average out the waypoints and these will be my final coordinates. If, for whatever reason, you are not satisfied with the coordinates you have taken, it does not hurt to go back to the spot again on a different day or with a different device.
5. Check Proximity
Now that you have a set of coordinates you’re happy with, you should check proximity to other caches. When you begin to create a cache page, the first thing it will ask you is for coordinates.

You will see red circles on the map. Your coordinates cannot be inside any of the circles. The map does not show you any hidden final coordinates, such as those for mystery or multi caches so it’s not a definitive list and you may only be notified of a proximity issue after you have submitted your cache for review.
If you have the final coordinates for any mystery or multi caches, you can do a distance check using this site: Boulter.
6. Choose your Container
Your geocache is going to be exposed to the elements so it needs to be something that is likely to stand the test of time and weather. Ammo cans and Lock & Locks are a pretty safe bet (provided they are closed correctly), but if you have something else, put it to the test before placing it.
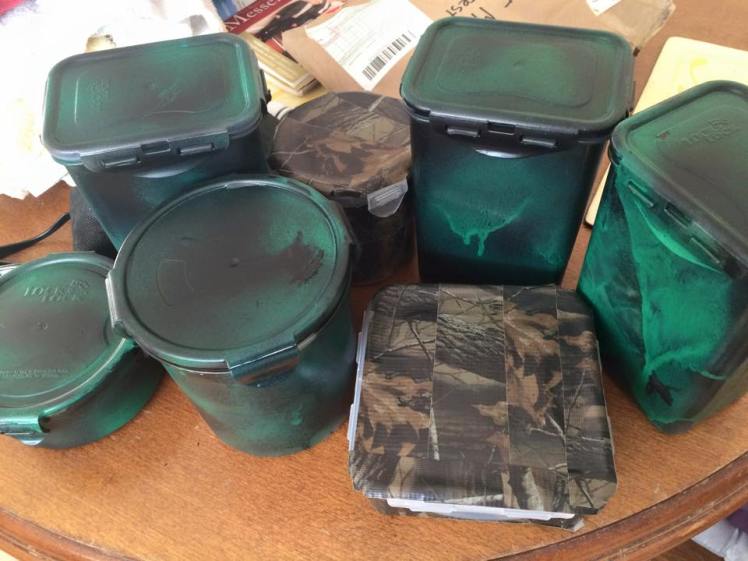
Put some paper in your container. Fill a bucket / sink with water and submerge the container in it with a rock or something heavy on top to hold it down. Leave it overnight. If the paper is still dry in the morning, chances are it will withstand the elements.
If you are making your own micro cache and are using magnets, you should also ensure that the magnets are strong. I find rare earth magnets best.
7. Choose your Cache Type
There are several different cache types you can hide and the reason for choosing each one is varied. If you have an interesting spot you want to bring cachers to but there’s no safe place to hide something, you could set up a multi cache. My advice would be to find a variety of cache types before hiding one yourself, so you can see how best to do them.

You can read more about different cache types here.
8. Choose your DT rating
As you become more experienced, you will find it easier to identify what difficulty and terrain ratings you should assign to caches you hide. When you’re starting out, you should definitely check out the Clayjar tool. This involves answering a set of questions about your cache and it will then suggest what DT rating you should choose.
9. Fill your Cache Page!
The cache description is broken down in to ‘short description’ (with a limit of 500 characters) and ‘long description’ (no character limit indicated). I usually leave the short description to just one or two sentences, then use the long description to get most of the information I want in.

This is where you can give cachers information on the place you have brought them, and why. You can also give some information about the hide itself and let them know if they need to BYOP (bring their own pen). You have free reign to write as much or as little as you want.
10. Add Images to your Cache Description
You don’t have to add images to your cache page but sometimes they make a nice addition. This is how you do it. After you have saved the cache page and your GC code has been automatically created by Groundspeak, you will see a box on the right entitled ‘Admin Tools’.
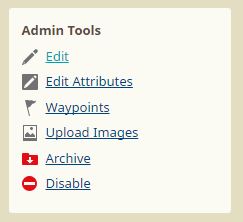
Choose ‘upload images’. Once your picture is uploaded, the file name will appear at the bottom of your cache description, like so:
Drag the file name in to a new tab in your browser and this will give you the html code for the image. The code ends with .jpg and appears in the address bar, like this:

Return to edit mode in the cache page. The page will now be in html – don’t be scared! Decide where you want the image to go and then add this html code: <center><img src=”
Now paste in the url you got above, then paste “></center>. Save the page and then view it and your image will appear.
Follow the Arrow have fantastic information on how to enhance your cache page even further using html code.
11. Attributes
Attributes are handy little things and you should use them if you can. They are a great way of letting cachers know what they might expect at GZ. For example, there is a thorns attribute, so this indicates gloves may be a good thing to bring.

12. Hint or No Hint?
Hints are by no means obligatory so it’s up to you if you decide to add one or not. They are certainly very welcome in places with high muggle traffic but that doesn’t mean you have to include one. If you don’t want to leave a hint, just leave the box blank. Nobody likes the CO who writes “it’s too easy for a hint”, in that box. Seriously, don’t be that person. Just leave it blank.
13. A Friendly Word to your Reviewer
Don’t just write “.” in your reviewer note. Your local reviewer needs some information about the geocache you’ve hidden so they can ascertain if it follows the guidelines. Contrary to popular belief amongst new geocachers, reviewers do not (read: cannot possibly) go out and physically check every geocache that is placed. Give them as many details as you can about the placement of the cache and what type of container it is. If you’ve set a puzzle, tell them how to solve it (this prevents people hiding mystery caches with unsolvable puzzles).
14. How Do I Know When My Cache Has Been Published?
Once you have submitted the cache for review, you will get two emails: one with Cache Report Submitted and the GC code in the subject line and the other with [LOG] Owner:ABC submitted XYZ (GC Code) to be published, in the subject line.
If the reviewer has any queries for you, they will come through the page and you will be alerted if and when they write a note. Once the issues have been sorted or if there were no issues, you will get an email with the subject Your geocache has been published.

Any reviewer notes, including the one you wrote when you first submitted the cache, will no longer be visible on the page.
15. If You Hide It, They Will Come
I often see posts on social media from cachers who have just hidden their first cache and are worried because nobody has found it yet. Don’t you worry. If you hide it, they will come. Even if it’s a cache that involves special equipment to get to, like a kayak. Eventually, they will come!
If you’re getting a lot of DNFs on the cache before it’s ever been found, then you may need to go check if it’s still in place and if it is, maybe think about upping the difficult rating.
16. A Cache Is For Life, Not Just For Christmas
Owning a cache is not meant to be a fling. This is a long term commitment. Sometimes, circumstances arise which mean that caches have to be archived before their time but the guideline is that a cache should be in place for at least three months.

Once the cache is out there, you will get emails every time someone writes any kind of log on it: found it, did not find, write note, needs maintenance and needs archived.
You don’t need to run out the door to check on a cache as soon as one DNF log comes in (although you can, should you want to). Depending on the difficulty of a cache, I usually wait for at least three DNFs before checking on it.
If someone logs a needs maintenance on your cache, you should check on it as soon as you can and attend to the issue, whether it be a full log book or a waterlogged container or a multitude of other potential problems. Once you have performed the necessary maintenance, you need to log an owner maintenance entry to get that little red maintenance spanner to disappear off your attributes list.
Have you hidden your first geocache yet? Let me know in the comments!
Happy caching!
Sarah
© 2016 | Sarah Murphy | All Rights Reserved

Great blog & advice Sarah 🙂
LikeLiked by 1 person
Thanks 🙂
LikeLike
Great post!
LikeLiked by 1 person
Thank you!
LikeLiked by 1 person
I would also add that you should hide your cache close to home as you don’t want to travel many miles if it needs maintenance.
LikeLiked by 1 person
A good point too, unless you have someone willing to do maintenance for you!
LikeLike
Thanks Sarah, for making it so clear😀
LikeLiked by 1 person
Glad you found it useful!
LikeLike
Thanks so much! I’ll be hiding my very first geocache later today and I found the concept to be a little overwhelming. I thought I was in over my head until I saw your article. Now I feel like I have a good grasp on everything. Thanks so much for the great post and all the help!
LikeLiked by 1 person
Glad to help! Good luck with your first hide 🙂
LikeLike